
Contour ROAM Microphone Modification
A Modification to the Contour ROAM Microphone to make it usable
I’ve been a long time Contour user. I owned and used the old ContourHD 720p back when Contour was still under Vholdr. I did a microphone mod to that old camera as well. I basically wired in a microphone input jack so that I could run a mic into my helmet to make commentary to complement my video footage. I recently picked up a Contour ROAM. I liked this camera, and after messing around with it, I decided to use it to replace my old ContourHD. However, the audio quality and microphone was absolute GARBAGE. Because of this, I decided to perform my Contour ROAM Microphone Mod.

Contour Roam Microphone Input Jack Mod
As the name implies, it is a modification to the existing Contour ROAM Microphone. Actually, it’s more like removing it completely and replacing it with a jack that will take any 3.5mm input mic. The tools I used were a small screwdriver kit, for electronics and such, a Dremel tool with a drill bit, a soldering iron, and a pack of the 1/8″ (3.5mm) Stereo Panel-Mount Audio Jack from Radio Shack. The jacks are pretty small, and come in a 2 pack for about 3 bucks.
Since the Contour ROAM was designed to be waterproof, the waterproofing meant that there were a lot more screws and seals than the Contour HD I cracked open two years ago. Regardless, if you’re somewhat mechanically inclined, you’ll figure out how to get it apart. Now the battery is integrated, so you want to be careful not to cause any shorts since you can’t disconnect the power during disassembly. There are a total of 17 screws you will need to remove to perform this mod. They are all tiny Phillips screws.
Step-By-Step Guide for the Contour ROAM Microphone Mod(Sorry no pics)
1. You will need to remove the aluminum/metal casing. Start with the lens ring. You’ll find a screw right under the 180° marker. Remove that screw and put it aside. Next, unscrew it by turning it counter clockwise. it should come off easily once the screw is off. After that, we need to remove the main body cover. There are two screws on each side, towards the rear of the camera. Unscrew them both and put them with the first screw (they are the same sizes). Slide the cover forwards, towards the lens. It will slide off easily.
2. After removing the metal cover parts, we will have exposed the white plastic top cover of the camera body. There are six silver screws holding it in, three on each side. Remove them and put them aside. There are an additional two small black screws holding in the cover from the rear of the camera. Make sure the rear cover is open, and remove the top two screws. After all 8 screws have been removed from the white top cover, it should come off easily. Be gentle, there is a ribbon secured to the main board. Gently remove the ribbon from the main board and put the plastic white top cover aside. You can also remove the on/off switch if you want. It pops right off.
3. Let’s go ahead and remove the TRails cover by removing the two black screws at the bottom. After these two are removed, pry it off, starting from the back of the camera. Don’t worry, it’s a bit flexible so you have some room to work with. After that’s removed, put it aside.
4. You’ll now expose the front Contour ROAM Microphone. It’s hidden behind a rubber cap, for waterproofing purposes I’m guessing. Remove the rubber piece and you’ll also notice the white rubbery sealant on the right side. You can snip off the button shaped microphone, we won’t be needing that for this Contour ROAM Microphone Mod.
5. Now we’ll go ahead and remove the battery and mainboard from the body. First, start by removing the large silver screw from the bottom of the body, then remove all the remaining black screws from the BACK of the camera. There are three on the back. Also, make sure you do not have a micro SD card installed. If you do, take it out. Now, look down into the body from the top. With the lens facing away from you, you’ll notice a small silver screw on the left side of the main board. Remove that and the mainboard and battery bundle will be loose. It’ll take some wiggling around, but the bundle should come out easily. Be careful of the ribbon connectors and a black wire leading to the lens. DO NOT YANK OR PULL on any of these wires. You’ll also see a black and red set of wires. These are the wires connected to the Contour ROAM Microphone that we snipped off earlier. You can pull that through the white rubber sealant. Feel free to remove as much of the sealant as you need to to get the wires out.
6. After working the main board out, we’ll shift attention back to the TRails cover. using the existing Contour ROAM Microphone hole as a reference point, use your Dremel and drill out a small rectangle, in the shape of the audio jack. It’s okay to go a little larger than the jack.
7. After this is done, we will need to do the same thing to the main body of the camera. First start by flattening out the Contour ROAM microphone holder and little box of sealant. After that’s flattened out, it makes it easier to cut evenly. Cut out an identical rectangle corresponding to the hole you cut on the TRails cover. Smooth out the rough edges with a file or sand paper.
8. Now we start to put everything back together. You’ll notice that the wire for the Contour ROAM Microphone is pretty long. It makes it a lot easier to work with. put the mainboard and battery bundle back into the body. Be careful not to twist, pinch or pull any wires. While you’re doing this, thread the mic wires through the opening you cut into the body. Now is a good time to test that the contacts are good.
9. Test the jack by connecting a mic to it, then put in a memory card. Connect the white plastic top cover ribbon back to the mainboard. Contact side out, away from the board. Then take the switch and hold it near the top, front area of the mainboard. This will activate recording. Just touch the wire leads to the jack leads. If you’re using the same Radio Shack jacks I listed earlier, the black cable goes to the tab coming from the TOP of the jack, closest to the threaded input hole. The red can go to either of the remaining tabs. I chose the one closest to the side tab for obvious reasons. After testing, pull out the card, pop it into the PC and see if your audio is working.
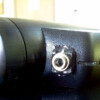
10. If the audio is coming through, it means your leads and wires are good. Put ALL the screws back to secure the mainboard. Then put everything back on. After everything is secure, solder the wires to their corresponding leads on the jack. I recommend putting a buffer into the hole separating the new jack from the mainboard and battery. I used a piece of foam. After You finish soldering, test it again just to be sure. After testing is confirmed, Stick the jack into the cut holes and apply epoxy to hold it secure. Let the epoxy cure overnight and you’re done with the Contour ROAM Microphone Mod!